
Thank you! Your comment has been submitted successfully. You should be able to view your question/comment here within a few days.
Error submitting comment. Please try again momentarily.

California residents: click here
Videos are provided as a guide only. Refer to manufacturer installation instructions and specs for complete information.
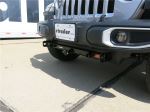
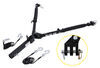
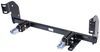
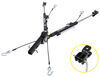
Ryan: Hey everybody, Ryan here at etrailer. Today on our 2018 Ford Explorer, we're going to be taking a look at, and showing you how to install the Roadmaster 12 Volt Outlet Kit. So there's going to be a total of five main components, needed to flat tow your Explorer down the road. The first one is going to be your Base Plate and the Base Plate is going to provide us with a solid and reliable connection point, that way we can hook up our Tow Bar to it. The Tow Bar is going to be that second component, it's actually going to be the physical link that connects the front of your Explorer to the back of your Motorhome. The third component that you're going to need, is safety cables.
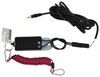
Now the safety cables are there in the event of a unlikely disconnect, these are good to keep your Explorer connected to your Motorhome.The fourth main component, that you're going to need, is Tow Bar Wiring. So the wiring is going to transfer, the lighting functions from the back of your Motorhome to the back of your Explorer, keeping you not only safe, but legal as well. And last but not least, you're going to need a braking system. A braking system, what it's going to do, is apply the brakes in your Explorer, whenever you hit the brakes in your Motorhome. That's going to help bring you to a safe and predictable stop.Now, there is a sixth component that isn't absolutely necessary, but it does make life a lot easier whenever you're flat towing.
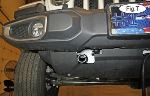
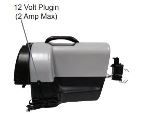
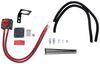
Since the Explorer does require you to disconnect the battery, whenever you flat tow, that can be a real hassle and you can avoid that, by picking up a automatic battery disconnect switch. That's going to allow you to disconnect and reconnect your battery simply by just pushing a button.So this is what your 12 Volt Outlet, is going to look like, once it's installed. It's out of the way, and you can hardly even notice it's there. Now the main reason, you're going to want to use this, is for those of you that have a portable style braking system. Those require an outlet to be plugged into, that way they can operate correctly.
Especially on the Explorer, since this does require you to disconnect the battery, whenever you're flat towing it, you won't be able to use that traditional cigarette outlet that's usually located here in the front, somewhere. That factory one just won't work, since the battery is disconnected, it's not going to have any power. However, with this Outlet Kit, you can wire it directly to the battery, that way it'll always have power. So not only can you plug your braking system into it, you can also plug in other components as well, so your phone charger or anything like that, that will also power those zones.So, just to kind of give an example on how this works, here we set in our portable braking system, we'll plug it into our outlet, and if we hit power, you can see that the unit turns on and it'll be able to function like it should. Now, there is one thing I would have liked to have seen, and that's if the plug came included with a little rubber cap or something, so whenever you're not using it, that outlet could be covered.
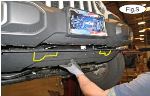
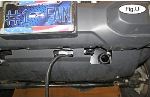
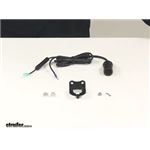
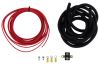
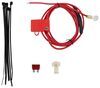
Especially since, you have it hot all the time, I just think it would be a nice touch. But other than that, there's really not a whole lot to it. As far as the installation goes, it's pretty easy, there's only a couple of wires you need to hook up. I will say, I did have to use a few extra pieces to get the job done, I did have to extend one wire a couple of feet, so you will need to pick some wiring up.And I did use a couple of different ring terminals. So, really not a huge deal, just more appropriate for our Explorer specifically. But speaking of installation, let's go ahead and hook it up together now. To begin our install, we're going to be working, here inside of the car, on the driver's side, underneath the dash. Now, the first thing that we're going to need to do, is take our wiring and route it through the firewall, that way we can get it up into the engine compartment. So you're going to take the other end of your wire, and push it through the firewall underneath the car. I will say, there wasn't a factory grommet that we could utilize. So what I had to do, is drill a small opening into the firewall, so if you kind of peel back the carpet, you can see that bare metal.So I drill the hole, and then just used a rubber grommet to put in that hole to keep the wires protected from roaming up against a bare metal. But this is right where I did it, and once I put that grommet in there, I simply just pushed the end of our wires through that opening. So here underneath, our Explorer, this is where our wire came out through the firewall. So once you have it here, you can start to push it up into the engine compartment. So here in the engine compartment, you can see, this is where our wires came up.Now, since the Explorer, the battery does required, to be disconnected whenever you're flat towing it. So in our case, we want to hook up our outlet directly to the battery, that way it'll always have power for our braking system. So what we're going to need to do, is just modify this a little bit, we are going to have to change the ends on it. So we'll start with this one, this is the one that has the fuse built in, and we're going to need to put on a ring terminal on the end there. So we're going to cut this, connector off, strip back the insulation and we can grab a ring terminal.Now these ring terminals don't come included, so you will have to pick them up separately. The way that works, is just slides over that bearing to the wire, when we crimp it down. Now for the negative side, this one could potentially work, go over the negative stud on the battery. However, I think we might run short on wire, and may give us some issues on where we can actually mount our plug so, you want some choices as far as that goes. So I'm actually going to extend this a little bit. Now, cut that off, straight back, going to grab a heat shrink butt connector, you pick that up here at etrailer as well, crimp it on, and then we can grab a little extra wire.So this wire is not included, this is something i just had, laying around. Strip that in back, into the butt connector, crimp it down, and I think I'm going to extend it maybe about a foot or so. Kind of trim that up, then on this end, we're going to attach another ring terminal. Crimp it down, then I can come back since I used to heat shrink butt connector, I will simply just take my heat source and seal up those ends.So we'll go ahead and start with the, negative side. Remove this nut here using a 10 millimeter, pull that off, and slide our ring terminal on, then tighten that nut back down. You go to the positive side, you can remove this nut here, and since this has a fuse in it, what I'm actually going to do, is take that out. Going to let that part set for now, don't lose that fuse, and we're just going to connect this end. That way, once we have everything ready to go, we can come back and reinstall that fuse. Pull this nut off here with a 10 millimeter, slide on a ring terminal and just tying it back down.So now back inside, our Explorer, underneath the dash, I mounted up the bracket and I just used a couple of self tapping screws to secure it. I will say with these brackets, the plug does fit very tight inside of there, so what I actually did, was just used a file and just kind of opened it up a little bit to make it easier. Then I just took our plug, kind of just ran up behind that panel there, and now we can push this into the bracket to keep it secure.Now, back under the hood, since we have everything hooked up, we can go ahead, and reinstall our fuse. Then we can find something to plug into our outlet, that way we can test it, and make sure it's working properly. So to test our socket out, I just grabbed this little charger and whenever it is plugged in, you should have some lights on the screen eliminate. So you can see, it lights up, you know we're getting power and it's working the way it should. And that'll finish up our look at and our installation of the Roadmaster 12 Volt Outlet Kit on our 2018 Ford Explorer.

Product arrived in a timely manner and in good condition. Installation was a snap. Very satisfied with service provided by Etrailer.
Installer recommended this to power the Even Brake system. Probably not necessary if your vehicle has one built in.
I ran this to the hot wire coming out of the 7 wire plug for the coach, I had to add wire to reach the front of the car. It has power any time I’m hooked up to the coach, I use it for my portable blue ox braking system.
I ordered the item from Kelly P online; she was great then. I paid an additional fee to have the order delivered in 2-days. The shipment never arrived. I tried calling and emailing her but she wouldn’t reply. Fortunately i called the customer service line and was refunded the item and cost of the additional shipping.
Great videos to assist with installatio n.

Worked great until it totaled the car. Installation was fairly simple. We used it for 5000 miles with no problems to power our Blue Ox brake.
I had it professionally installed. It appears to be functioning fine. Our first trip is coming up Friday so I’ll give it a true test.
lighter cylinder doesn't fit bracket. I bought this as a kit if it does't fit its not & should not be sold as a kit. Spent an hour filing bracket to fit cylinder. Not happy.
Pretty simple . Keeps battery charged.
easy to set up and works great
Needed for towing for the lights and have had no issues at all using this for the last year
Working great
Provided valuable consultation on device needed to resolve my needs.
Works great
fairly easy install when you follow the video's
I'm installing this currently. It is very well made and installation is quite simple. This is a dash install for me as I'm using this to power my Furion monitor that sits on my dash.
Works just as it should. Easy to instal l.
I did not like this at all but it works.
Good instructions and easy to instal tnx to Lori AB for putting my order together
Had this installed to power my patriot braking device, works great!
Great device. Gives that much needed HOT accessory socket inside the car for the braking system and when not towing, other accessories that you want to dtay connected to the battery when the ignition is switched off. (inverter for a laptop or tablet charger for instance or even a small TV.) Could be a little less expensive but it IS a higher amperage socket than you can find at the local car parts store. Quick and easy install. Recommend wire loom around the wires to protect them from wear in the engine compartment
Works as designed. Use it every time we attach our toad.
This 12 volt wiring kit was easy to install. I use it to provide power to my Roadmaster 9400 Even Brake supplemental braking system in a 2017 Chevrolet Equinox. It is quality product. The Video by etrailer.com provided a helpful addition to the instruction supplied with the kit.

Jimd

7/28/2018
Still performing great. Easy installation. I recommend this kit.
I watched the installation video before purchasing this Outlet Kit. My installation of it was into a 2010 Subaru Forester and was no different than the video. It went without any difficulty.
The only weak point to the kit in my opinion is the brass connection piece that attaches to the fuse. It fit over the fuse connection fin without any problem.
The shortfall comes when one connects the female positive connector to the exposed part of the brass connector. The positive connector is much wider than the brass connector which goes on the fuse, making the connection loose. I crimped the positive connector in order to keep it attached to the brass connector.
I ran the outlet wire under the door sill, in the wire trough there so the outlet would be in the rear seat area. I use the outlet to power my 12VDC car refrigerator.
James L.
7/14/2022
It performs perfectly. I am extremely satisfied with the product.
Simple, easy, effective. What else do you want.
Do you have a question about this 12V Power Accessory?
Info for this part was:
At etrailer we provide the best information available about the products we sell. We take the quality of our information seriously so that you can get the right part the first time. Let us know if anything is missing or if you have any questions.


Jim H.
1/2/2021
Awesome. Great power source for cell phone charging or an inverter for powering a laptop